Barbecued Chicken


Here's a great little recipe that requires you to fire up the grill and roast these suckers to perfection. The perfect party food that everyone will LOVE!


Here's what you'll need:
  • Several pounds of chicken (thighs, legs, breasts anything)
  • Your Favorite BBQ Sauce
  • 2 Tsp Onion Powder
  • 2 Tsp Garlic Powder
  • 2 Tbls Lemon Juice
  • Dash of Cayenne Pepper
  • Salt
  • Pepper
  • 3 Tbls water
In a large bowl mix together all the ingredients except for the chicken - Mix thoroughly. Allow the chicken to marinate for at least an hour before grilling. Once the chicken has been marinading, remove from the marinade an place onto a hot grill. Take the extra left over sauce and place into a pot and simmer until rapid bubbling. Once the sauce is bubbling, continually turn the chicken while coating with the sauce. The sauce will create a nice crisp of flavor on the outside of the chicken. Once the chicken is finished, reheat the sauce, pour into a small bowl and use as a dipping sauce.


food, cooking, meals, eating, meat, beef

Penne and Vodka Sauce

This recipe is a bit long, but its worth it!


1 large onion diced
1/2 lb proscuitto or 1 ham steak or Both-diced
1/2 lb butter
1/2 lb sun dried tomatoes(optional)
1 can or frozen baby peas (optional)
3 cloves garlic
Tbs. Parsley
Tbs. Basil
Tbs. Black pepper
Tbs. Crushed red pepper
Large can crushed tomatoes
One quart half and half
Large can chicken broth
Pint vodka
4 shots brandy
Rue to thicken

In a large frying pan- melt butter. Sauté onions, sun dried tomatoes, garlic. If using ham steak dice and add to sauté.

In a Large pot-
Add chicken stock
Half and half
All spices
Sauteed mixture
Diced proscuitto
crushed tomatoes
Salt to taste

Simmer about an hour thicken with rue as needed.

Recipe for rue-1 stick butter
1 cup flour
Melt butter
Slowly add flour
Constantly mixing until a nutty smell.
Add 1 small can of chicken stock slowly.
Slowly add to sauce,  constantly stirring.  Simmer 20 minutes add uncooked peas 5 minutes before

Once sauce has thickened, throw over cook Penne, mix well and Enjoy!

Amazing Barbecued Ribs

Need a great idea for your next upcoming party? This recipe is amazing. Loads of flavor, and the meat will just fall off the bone!
Here's what you'll need:
  • 1 pkg of Ribs
  • Your favorite BBQ sauce
  • 1 tbls Onion Powder
  • 1 tbls Garlic Powder
  • Salt 
  • Pepper
  • Sugar
  • 1/8 C Ketchup
  • 2 Cloves garlic - crushed
  • 3 tbls vinegar
  • 4 tbls Worcestershire sauce
  • And if you have it, a dash of Liquid smoke. 
First we need to boil the ribs. Then we can marinade the ribs. Either in a large bowl, or baggie; combine the list ingredients above and mix well. If you like spice, throw in red pepper flakes, a hot sauce, or cayenne pepper. Let sit for several hours.

Once you think its done marinading, take the ribs out and put them into a preheated 350 degree oven. DON'T throw out that marinade though, we are going to transfer that to a small pot and heat it up. This will act as the glaze for the ribs which are baking away in the oven. Once the sauce is bubbling, allow it to sit and thicken up. Every 20 minutes or so, brush the sauce onto the ribs and continue baking. Do this for about an hour.

Once the ribs spent an hour in the oven, its time to fire up the grill. The grill should be already hot around medium heat. You will lay the ribs on and ONLY turn them once. Use what left over sauce you have left and generously pour onto the ribs. After about 15 minutes, remove from grill, allow to cool and enjoy!


Campfire special part 2


This isn't really a recipe, its more like awesome.. (Yes, I just did that, deal with it..)
Who loves roasting marshmallows on an open fire??? I might love it more than what is acceptable in normal measurements. But who cares..And before everyone starts arguing about how you roast a marshmallow, and when its "done" I'll just settle this right now.. Until it is no longer looking like a marshmallow, just a big black harden shell of molten sugar!! OK enough talk about that, lets instead focus on one word, and one word only... SM'OREOS!!! Yes that's right, I just went there!


I came about this very early in the morning when I was digging around the back of the truck looking for food. I came across a camping necessity, marshmallows, and my necessity... Oreos.. Then it hit me like a brick wall, and I was more excited than a kid in a candy shop! Seeing how 10am is too early to start binge eating sugar, I was forced to wait till dark.

Here's what you'll need:
  • Copious amounts of Oreos
  • Copious amounts of Marshmallows
  • Copious amounts of Campfire!
I debated with friends, and tried multiple ways. But we finally all agreed on roasting the marshmallow to your liking. Once that's done, twist the Oreo apart and place that molten goodness on the cream filling. Then simply reconstruct the Oreo with it's new ingredient and consume this magical deliciousness!


WARNING!
This is highly addictive and you may go through a pack of Oreos disgustingly fast, but ITS OK!! I won't judge, and you'll love this too much to care!

P.S. - Unfortunately not 1 bear was seen.. We looked for days on our hikes, but we did see a young buck, and multiple bunnies (The liked our campsite.) I will also leave you with this image I took while hiking.. If this doesn't make you want to go explore, nothing will.


Camp fire special!! Part 1

Writing this post is bittersweet to me. Why, you might ask? Well I left the blog, twitter, and other implements that we use to keep us going in the hands of my trusted contributors 4 days ago. I turned 21 again on the 19th of August and my friends and I decided that we want to celebrate another way rather than just going out and partying. I - a camping newbie to say the least - spent the last 4 days in the wilderness cooking over an open fire, gathering wood, and cutting it down to size with only a hatchet! So what I write here is just 2 of the creations that I came about while camping. I hope you one day will spend a few days out in the woods - hiking, biking, and sleeping on the ground. It's a joy, and relief to disconnect from the world and just be you. This officially marks the end of my summer, and will be moving back to my campus by the end of the week. But don't fear I will stay here! Without further ado, I present to you: Campfire Foil Dinners!

I apologize for not having a picture, my camera was dead.

Here's what you'll need:
  • Tinfoil
  • Ground Meat
  • Potatoes
  • Carrots
  • Onions
  • Garlic
  • A splash of oil if on hand
  • A CAMPFIRE!! (It's kinda important)
Optional:
  • Garlic Powder
  • Onion Powder
  • Meat Tenderizer
  • Seasoned Salt

First, lets wash the vegetables as best you can, with whatever clean water source you have. Don't worry about peeling anything, we're going rustic here! Spread out a fairly large piece of tinfoil onto your campsite table and if you have a bit of oil lightly grease the bottom. The next thing you will want to do is to grab your ground meat and press it flatly down on the tinfoil, leaving ample room on the edges. Next cut up the all veggies into small almost bite sized chunks and throw those on top of the meat. I unlike other campers had several spices - I mean, common.. I want full flavor! - including onion and garlic powder, meat tenderizer, and seasoned salt. I sprinkled each of those on the meat and veggies along with a bit more oil. I then tried my best to enclose the tinfoil packet with more foil.... After successfully putting 3 pieces of foil around it, I won the battle. I then placed (don't throw like usual it might break) this packet into the hot embers of the fire and let it sit. I fashioned a turning device with sticks and flipped the food every 5 minutes. After several flips, the meat was fully cooked and the veggies were amazingly soft and tender. I had myself a hot, delicious dinner. Cut open that foil, place it on the picnic table, and dig in.
Enjoy!

Man Food: Pizza

     Welcome back, seekers of gastronomical ruggedness. In the interim, between last post and this, I have reflected inwardly. What was I reflecting upon? How often to butch you and your taste buds up. Originally I wanted to post once a month but, Beef Jerky  (Still being capitalized) was so friggin awesome I'm Man Fooding your face twice a month.


Now lets begin. Ready? GO!! Pizza with BACON.


What your going to need.
Ingredients: (This made 2 pies)
  • Flour (~2 cups*)
  • Corn Starch (1 Cup)
  • Corn Meal (1 cup)
  • Olive Oil (1 Tbsp)
  • Yeast (1 Tbsp)
  • Water (~1 1/2 cup*)
  • Salt (1 Tsp)
  • Sugar (2 Tsp)
  • Helicopter (optional)
  • Toppings (1 lb. of bacon, not optional)  
         *More of these may needed to be added while kneading the dough the moisture in   
  the air ad in your hands affects the dough to the point of not enough or to much moisture
  1. Start by adding your yeast, sugar, and olive oil to warm water. Warm the water first you don't want to kill the yeast.
  2. In a separate bowl combine your flour, corn starch, corn meal, and salt
  3. After your yeast has been activated (It will have a head to it) 

  
   4. Go ahead and shove both mixture into a a bowl and mix with a spoon until everything 
       is "lumpy" then dig in with your hands. 
   5. If the dough is sticking to your hands then its time for more flour. If all the ingredients 
      aren't coming together, then you need more flour. Dough should be like Voltron. 
      everything working together in the right amounts.

 When the dough has been brought together and kneaded throw a towel over the bowl and let the dough rise and move on to the second part. BACON.

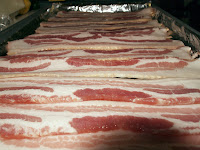
Cook it how you want, Ive seen too much of epic mealtime to not cook it like a professional baconerteror, in the oven


Lay out your non-optional bacon on a cookie sheet in a the manner above, place the cookie sheet, now paved with victory, into a 400˚ oven for 10-12 minutes pull it out flip it and repeat.

Helicopter: Preparing for bacon patrol duty, looking for bacon pirates.
Now is the time for the final steps.

Preheat your oven to 400˚ or leave it on from your baconing.

Stretch your dough over a cookie sheet. Slather on some sauce (I used a homemade from the garden sauce, recipe coming soon), then put your toppings on, then cover them with cheese. Cheese goes on top, it holds in the baconie goodness.

  • How to stretch your dough, drape it over your fingers on both hands and gentle widen the gap between careful not to tear it.

  • Cookie sheet. Oil it, non-stick spray it, or flour it.
Fold over and lightly flour


Oven time is about 15-20 minutes. or until the bottom of the crust is lightly browned


Bam! Pizza! Done. Michelangelo would be proud.

If you like this article or any other article, or want to suggest a recipe or anything else you can reach us at Itsbestservedhot@gmail.com All feedback is welcome.

    Chicken Paprikash over Sweet Potatoes

    This is a great, slightly spicy little dish that is quick, simple, fun and healthy. This recipe was found in my Cooking Light book and the original recipe is linked at the end of this post. I made a few edits to make it just a little more healthy and a little more flavorful.

    What You'll Need:

    • 4 Sweet Potatoes
    • Chicken Tenderloins
    • 2 tblsp whole wheat flour
    • 2 tsp Paprika
    • 1/4 tsp Red Pepper Flakes
    • 1/2 Red Onion
    • 2 Portabello Mushroom
    • 1/2 cup fat free/low sodium Chicken Broth
    • 1/4 Cup Light Sour Cream
    • 2 Garlic Cloves
    • Butter
    • salt
    • pepper

    Cook your Sweet Potatoes in the microwave until soft..about 15-18 minutes. Before you put them in there, stab them a few times all around first to let the heat in.

    While the sweet potatoes are cooking, dice up the chicken tenderloins into bit sized pieces. In a mixing bowl, add the chicken, and all dry ingredients and mix well.

    In a large frying pan melt about 1 tablespoon butter on med-high heat. Once it starts melting, add the coated chicken along with the mushroom (which should be cored, cleaned up, scraped, and chopped into cubes) and saute for about 5 minutes, or until the veggies become tender and the chicken is cooked through.
    Next, stir in the chicken broth and cook until the sauce thickens for about another 5 minutes. Once everything is married and in love in the pan, remove it from the heat.
    While off the heat, add the sour cream and mix well.

    Arrange the sweet potatoes on a plate and make a small slice in the center leaving the ends uncut so it looks like you poked a pocket into the potato. Take a fork a fluff the inside of the potato as well as you can, but no need to go overboard and be gentle. We don't want to destroy the skin.

    Add the chicken mixture into the potatoes by spooning it in, so the sweet potatoes become the bowl. Spoon on some extra sauce.

    Serve just like this and eat until stuffed.


    Potato Salad

    So yea, even though this blog is titled "Best Served Hot" I have a lot of cold salad recipes. But don't act like you don't love them. This recipe is courtesy of a chef friend. Thanks Mike!


    What You'll Need:

    • 5 lb Red Bliss Potatoes
    • 1 cup light mayo
    • 1/4 cup dijon mustard
    • 2 cup apple juice
    • 1 cup red onion
    • 1/4 cup fresh dill
    • 1/4 apple cider vinegar
    • salt
    • pepper


    Make It:
    With the skin still on, quarter and boil the potatoes. Cook them enough, but keep them slightly firm so it doesn't get mushy.
    As the potatoes are cooking away, add the apple juice to a small pot and boil this down until about half has disappeared to a 1/4 cup.
    While cooking the potatoes, add all of the ingredients in a large mixing bowl including the reduced apple juice.
    Let this all chill in the fridge while the tots are going.
    Once the potatoes are done, drain thoroughly and add to the mixing bowl and mix well.

    Serve Chilled

    Other Options:
    This is in the orinigal recipe, but I pulled it because I don't love bacon and it's not on my healthy food agenda. However, for you bacon lovers out there:

    Add 2lbs thick sliced bacon
    Cook the bacon on med-low heat until the fat is rendered out and crispy. Once done, place the bacon on a papertowel to pull the extra grease.
    When cool enough to touch, chop into diced pieces, add to the salad and mix.
    It's really, really, good.


    Vegetable Fried Rice

    Want to put a spin on the same rice that you always have? Well This recipe is really easy, and I'll let you know how to do it.


    Heres what you'll need:

    • 4 c cold white rice
    • 1 carrot
    • 3 green onions
    • 2 tbls oil
    • 1 tsp sugar
    • 1 egg (OPTIONAL)
    • 2 tbls soy sauce
    First lets slice the green onions, and slice the carrots. Then in a large pan or wok heat up 2 tablespoons of oil. Once the oil is hot, throw in the carrots and allow them to cook until they are soft. Once the carrots are done, throw in the green onions next. After a minute or so, crack in egg and scramble it. This is a good time to break apart the egg into tiny pieces. Once the egg is fully cooked, throw in the rice and break that down if it is in clumps. Allow the rice to get hot, then add 1 teaspoon of sugar, and continue mixing. To finish off the rice throw in 2 tablespoons of soy sauce and mix through.

    Once the soy sauce is completely mixed through and the rice is hot again, remove from heat, plate and enjoy!!


    Pesto Mayo

    Pesto Mayo

    • 4tbls Light Mayo
    • 10 Fresh Basil Leaves
    • 3 tsp Extra Virgin Olive Oil
    • 1 Garlic Clove
    • 1 Pinch Salt and Pepper


    In a food processor, add of the the ingredients for the Pesto Mayo and blend until smooth. 

    Caprese Sandwich

    Looks like somebody bought a lot of fresh basil and mozzarella! This sandwich was SO good, I kind of surprised myself! I can eat this every day of the week if I could.


    What you'll need:

    • 2 Chicken Breast
    • Fresh Mozzarella
    • Fresh Basil
    • 2 Portuguese Rolls
    • 1/2 cup Whole Wheat breadcrumbs
    • 1 Egg
    • 4tsp Fat Free Milk


    Balsamic Vinaigrette:

    • 1/3c Balsamic Vinegar
    • 4tsp Extra Virgin Olive Oil
    • 1tsp sugar
    • 1/4tsp Oregano
    • 1/2 Minced Garlic
    • Pinch of Salt/Pepper
    • Splash Water
    To start, we will begin with making our own balsamic vinaigrette. In a small pot, add the balsamic vinegar, sugar and oregano. Let this simmer on low heat until it reduces until about half of it's content and stir continuously. Once it reduces, add the garlic, salt and pepper. Let this simmer for another 2 minutes and remove from heat. After we remove it from the heat, add the Extra Virgin Olive Oil and stir well. Refrigerate this to let it get cool.

    Next, we can start prepping the chicken. Trim all fat from the chicken breast and cut in half. Pound the chicken to make it thinner. In a mixing bowl add the egg and milk and beat them together. On a separate plate, place the bread crumbs for dredging. Dip the chicken in the egg bath, then coat with breadcrumbs. Add this to a hot pan with some oil and butter, and cook on medium heat. Cook on both sides for approx 5 minutes each. While the chicken is cooking, slice the tomato and fresh mozz. 

    Then we will slightly toast the bread, just enough to get it warm. Place the chicken on the bottom side of the bun, then top with basil, fresh mozz, and tomato. Drizzle some of the balsamic vinaigrette on top and serve. 

    All hail this sammich!


    Tortellini Salad

    So even though the title of this blog is "Best Served Hot" here is another salad! This is perfect for summer bbq's and to add a fun change to your run of the mill pasta dinner. Thanks to Aunt Cindy for this one, it's so delish!!!


    What you'll need:

    • One finely chopped medium sized red onion
    • Three or four  chopped carrots
    • Three or four chopped stalks of celery
    • One finely chopped red pepper
    • One finely chopped green pepper
    • One finely chopped yellow onion
    • Two pounds of tortellini cooked al dente.

    Chop and mix all veggies with lite Italian dressing while tortellini cools. Mix in tortellini cover and refrigerate 2-3 hours before serving

    Magnolia Cupcakes

    Ever hear of those cupcakes that were made famous by Sex and the City? Well the lovely ladies at my job like to celebrate birthdays with them...it just so happens it was my birthday. Here's a photo of the fantastic Magnolia Cupcakes. (in real life)


    Caprese Pasta Salad

    Questo è molto delizioso...or whatever. This is very delicious. So eat it.

    Aww Pastina!! love it!

    What you'll need:
    • 1/2lb Pastina Pasta
    • 1/2 Clove Garlic
    • 3tsp Red Wine Vinegar
    • 1/2lb Fresh Mozzarella
    • 10 Grape Tomatoes
    • 1tsp White Wine
    • 2tsp Extra Virgin Olive Oil
    • 9 Leave Fresh Basil
    • 1/4tsp Oregano
    • 1 pinch salt/pepper
    Make it:
    Bring 3 cups of water to a boil with a pinch of salt and a 1/2 tsp of Extra Virgin Olive Oil. If you're going to use Pastina, add it to the boiling water and continue to stir. This will cook quickly, in about 3 minutes. Keep an eye it. The water should reduce to nothing and your little stars should be fully grown. Take off the heat while still slight al dente. (Al dente means "to the tooth" in Italian so there should be a bit of a bite to the pasta before removing from heat. It will continue to cook after removing from the heat) Refrigerate with a cover while we work on the rest.

    In a bowl, add the grape tomatoes, sliced in half with the shredded basil, minced garlic clove, and the rest of the ingredients. Let chill.  Once cold, add the pasta and continue to keep cold. While cooling, stir the cold pasta salad and add salt and pepper to taste. 

    Served chilled!

    Optional: Use whole wheat pasta such as Rigatoni

    Steak and Potatoes

    Make yourself look like a fancy little chef with this simple steak and potatoes without the grill. It's a small effort with BIG flavor.


    What you'll need:

    • 2 Shell Steaks
    • 2 Medium Sized Sweet Potatoes
    • 3 Garlic Cloves
    • Pinch of Salt
    • 1 tsp Black Pepper
    • Butter
    Optional:
    • Romaine Lettuce
    • 1/2 Cucumber
    • 3 Grape Tomatoes
    • Crumbled Goat Cheese
    Make it:

    Make sure to trim all the excess fat off the steaks. If they are shell steaks, there shouldn't be much.
    Mince the garlic as finely as you can. Then, spread it on both sides of the steaks and rub it into the meat. Do the same with a few and healthy shakes of pepper (enough to actually see the pepper covering the meat) and lightly salt. Let sit for about an hour to let those flavors melt in.

    Skin the sweet potatoes and dice into medium sized cubes.

    Heat one pan on med-high with your choice of cooking spray, or some light butter. Once the pan gets nice and hot add your steaks. Cook for about 7 minutes on each side or until it reaches the desired level of done-ness. There is no need to poke and prod and move it all around unless the pan gets dry. 

    In another pan, add your choice of cooking spray, or light butter and a drizzle of extra virgin olive oil, add your potatoes. Put a lid on your pan and let it cook on med heat. After approximately 5 minutes, stir the potatoes around and place the lid back on. Let it sit for another 5 minutes.

    After the 5 minutes pass, take the lid off the sweet potatoes and turn the heat up to high. Continue to cook until they crisp and brown. The potatoes usually take longer than the steaks do, so I always start them beforehand. 

    The optional:
    Although the steak and potatoes are dee-lish on their own, it might be a good idea to add a small salad to the plate. Not only will it add some color and take up that extra space, but its just never a bad idea to have a salad. 

    General Tso's Chicken

    I was in the mood for some Chinese food last night and decided to take a crack at it. It looked like it would be difficult, but it was SUPER EASY!! Well lucky for me, it turned out awesome! Lucky for you I'll share how I made it!


    Here's what you'll need: 
    • 1 pkg of chicken (I used thighs)
    • 3 green onions
    • 2tbl cornstarch
    • 1 tbls sugar
    • 1/4 tsp crushed red pepper flakes
    • 2 tbls sugar
    • 3 tbls water
    • 2 tsp ginger
    • 3 cloves of garlic
    • 2 tbls rice vinegar (or white vinegar)
    • 4 tbls soy sauce
    Lets start off by first cutting up all the ingredients such as the ginger, garlic, and onions. Slice the green onions, peel and mince or grate the ginger, and then mince the garlic. Next combine all the ingredients except for the chicken into a bowl and allow to sit. Next cut the chicken into about 1 in. chunks and pan sear them in a wok or a regular pan. Once the chicken it completely cooked through, pour the other ingredients onto the chicken while the pan is still on. keep stirring until the sauce thickens. Once thick, transfer to a plate and ENJOY!

    If you want more spice, add more crushed red pepper flakes!
    If you want more sauce, just double the recipe but only use a total of 3 tbls of cornstarch.

    Tomato and Fresh Mozzarella w/ Balsamic Reduction

    This fresh and delicious summertime salad is quick and easy.


    What you'll need:
    • Fresh Mozzarella
    • 2 Fresh Tomatoes
    • 5 leaves of Fresh Basil
    • 1/4 cup Balsamic Vinegar
    • 1/2 tsp Sugar
    • Romaine Lettuce
    Make it

    In a small pot, add the Balsamic Vinegar and sugar and put on low heat. Let simmer until it reduces to half the amount and stir often. Take off heat after the vinegar turns to a syrup-like consistency.
    Shred 3 leaves of romaine lettuce and spread it over a plate.
    Slice about 1/4 inch thick pieces of fresh mozz and the fresh tomato.
    Place the basil leave in a circular shape around the plate and add one in the center.
    Alternate the mozz and tomatoes on top of the bed of basil and lettuce.
    Lightly drizzle the balsamic vinegar reductions to finish.

    OPTIONS: Substitute arugula for romaine to add an extra kick of flavor. Oh so good!

    MY Awesome White Rice

    This is a REALLY simple recipe, I love it and you will love it too! Not many people know how to cook rice properly, and after this you will NEVER use that disgusting quick rice again! Here's the deal, I made white rice for my friends a few times, and now EVERY time I'm over their houses, they ask me to make it again, and again. Apparently "they just can't make the rice the same way I do.." So people of the internet, I'll let you in on my little secret!


    Here's what you'll need
    • Dry long grain rice (none of that quick rice stuff.)
    • A pot WITH a lid
    • Water
    • Salt
    That's it!

    The directions of the rice always state that it's a 2 - 1 ratio. 2 parts water, 1 part rice. Now heat your water till its boiling, once it is throw your rice in and return to a boil. Don't forget to stir. I always add just a little bit more water to the rice. This makes helps make the rice sticky and softer! Once it starts boiling again with the rice, stir and lower to the lowest flame and cover. This is where people will disagree with me.. I stir my rice often, others swear by just letting it sit all by itself. Well if you keep doing it the same way, you'll keep getting the same results. So stir every 5 minutes or so and cover again. This helps release the starch the rice holds onto, thus making it sticky! Once there's no more water and the rice is soft I stir the pot getting all the rice to stick together and comes out mostly in 1 lump.

    That's how I make my rice, which is constantly asked for every time I'm with my friends!
    On second thought.... I should start a rice fund..

    Breakfast Burger

    I don't care what time of day it is when you eat this burger. The bottom line is that you MUST eat this burger. It's killer.


    What you'll need:

    • 1 lb 96% Lean Ground Beef
    • 4 Eggs
    • 1/2 White Onion
    • 4 slices Fat Free Sharp Cheddar Cheese
    • 1/4 tsp Worcestershire Sauce
    • Grill Mates Hamburger Seasoning (or your favorite kind)
    • Lettuce
    • 2 Tomatoes
    • Kaiser Rolls
    • 6 Bacon Slices (low sodium)
    Make It:
    In a mixing bowl add the ground beef and burger seasoning and a dash of Worcestershire. Mix this together well. Once mixed, make your burger patties. I make 4 from 1 pound of beef.

    On the side, roughly chop up the onion. Once chopped, smash the onions onto one side of the burger while keeping the patty in tact. 

    This cooks best in a pan as opposed to a grill because of the onions. Heat the pan on high heat with a tsp of butter and let the pan get super hot. Once there, place the burgers in the pan, onion side down. Let the aroma take over--yuuuumm.

    Press on the burgers every once in awhile to keep them flat before they ball up. After 6 minutes, flip the burger and repeat until you reach the desired level of done-ness.

    In a smaller pan, cook the bacon until well done on med-high heat. Once cooked, place the bacon slices on a plate with a paper towel to drain the excess grease.

    In a separate pan cook your eggs over easy. You read that right, cook the eggs as normal with some salt and pepper. 

    After you determine your burgers are done, place the cheese over the top of the burger and put a lid on it and let the cheese melt. This should take all of 45 seconds.

    Take your burgers off the heat and put them on the bun, onion side down, layer the egg on top of the burger and then top with lettuce and tomato. Enjoy that bad boy.

    Optional: Add Pesto Mayo!

    Home Grown Tomato Salad

    Whats the best thing about having your own garden? Having a nice stock of fresh tomatoes on hand just waiting on the vine just out the door. This cold, refreshing salad is a perfect way to beat the summer heat and eat healthy too. It takes just minutes to enjoy!

    Here's what you'll need: 
    • 4 Tomatoes
    • 1 Red Onion
    • Basil
    • about 1/4 c Red Vinegar
    • 1/4 c Extra Virgin Olive Oil
    • Salt and Pepper
     Cut tomatoes into chunks and - if you like - remove the seeds from the tomato. Next dice about half of red onion and throw that in a bowl along with the tomatoes. Throw in the basil along with the salt pepper, and then cover with oil and vinegar. Cover and refrigerate to allow the flavors to get to know each other. Once chilled serve and enjoy!

    B.L.T. with Pesto Mayo

    This is awesome. Thank you, Jesse, for this delicious lunch!

    What you'll need:

    • 1lb Bacon
    • 2 Tomatoes
    • 6 Slices Whole Wheat Bread
    • Lettuce


    Pesto Mayo

    • 4tbls Light Mayo
    • 10 Fresh Basil Leaves
    • 3 tsp Extra Virgin Olive Oil
    • 1 Garlic Clove
    • 1 Pinch Salt and Pepper


    In a food processor, add of the the ingredients for the Pesto Mayo and blend until smooth. Refrigerate until we need to use it.

    Cook bacon until completely browned on med-high heat. Once cooked, place on a plate with a paper towel to drain some of the grease off the bacon. Then, lightly toast the bread. After toasted, lightly spread one slice of bread with the pesto mayo and then add the lettuce, sliced tomato and bacon.

    by the way, i'm impressed with my own picture.  yay!

    Garlic Bread

    This just might be the best garlic bread you have ever had! Its also probably one of the easiest!!
    Here's what you'll need:
    • Butter
    • Cloves of Garlic
    • Bread
    • Spices (listed below.)
    Start by mincing up the garlic as small as possible (if you have a small food processor, this might be the best. A mortar and pestle would work too.) Put your desired amount of butter in a small bowl along with the garlic you minced. Mix together with basil, onion powder, and oregano. It'll look something along the lines of this:


    Once you get all your spices knowing each other its time to spread it on the bread you have cut length wise.


    Once you spread as much as you want on, put it in a preheated oven at 350 for about 5-10 minutes. (Mostly until its hot and the butter has melted. Serve with your favorite pasta as a side dish, or just enjoy it by itself.

    It's that simple!

    Extra Goodies!!!:
    Love garlic but hate garlic smelling hands?!?!? Well, just wet your hands and rub them against something that's stainless steel. It will instantly take out the garlic smell which could normally last for days!!!


    Portobella Burgers!

    Tired of your same old ground meat burgers? Don't eat meat? Do you want a healthier version of your burgers without breaking bank?? Well try these bad boys out!


    Here's what you'll need:
    • Portobella Mushrooms
    • A clove of garlic
    • Onions
    • Lettuce
    • Tomatoes
    • A nice bread roll
    • Olive Oil
    • Your preferred condiment topping
    Lets begin
    You first want to take the stem out of the portobella mushrooms. Next, the gills have to go too. The gills are those brown/blackish strips under the cap of the mushroom. I suggest using a spoon and gently scraping them out. Next lightly brush the mushroom with olive oil to prevent them from sticking and place them in a hot pan. Cook them until they are soft.
    For the bread
    Which ever type of bread you choose, cut in half if it isn't already and then toast it. Once you reached your level of toastiness cut the clove of garlic in half and rub it on the inside of the bread.
    Once everything is completed serve the burgers topped with lettuce, onions, and tomatoes.
    Enjoy!

    Crispy and Crunchy Coleslaw!

    Need a refreshing side dish for the summer? Don't like what you buy in the store?? Well change that now!


    Here's what you'll need:
    • 1 sm head of Cabbage
    • 1/2 c Mayo
    • About 1/2 cup Sour Cream 
    • 1 Tbsp Onion Powder
    • 1 Tsp Garlic Powder
    • 1 Carrot
    • 2 Tbsp Lemon Juice
    • Pinch of Salt and Pepper
    Start by getting the mayo, sour cream, onion, garlic powder, lemon juice, salt and pepper mixed well in a medium sized bowl.  Next peel and shred the carrot and throw that into the bowl, mix well. Once the carrot is getting to know it's new neighbors, shred and separate the Cabbage. Once its all separated and into bite sized pieces, throw that into the bowl mix well, and ENJOY! It's that simple!

    Crab Cake Bites!

    Make your regular 'ole crab cakes into fancy little bite size appetizers.


    What you'll need:
    (all veggies measured as minced)

    • 8 oz fresh crab meat
    • 1 tsp celery
    • 2 tsp red onion
    • 2 clove garlic
    • 1/2 tsp green pepper
    • 1 raw egg
    • 2 tsp lemon juice
    • 2 tsp Worcestershire
    • 1 tsp spicy mustard
    • 1/4 tsp mayo
    • 1 dash cayenne pepper
    • 3/4 cup whole wheat bread crumbs


    Garnish Ingredients:

    Ok. This looks like a lot of work, but it's not. Mince all of your veggies, or use your food processor. In a mixing bowl, add all ingredients, including the beaten raw egg. Gently, but thoroughly mix, all ingredients together. Try not to break up too much of the lumps of crab meat.

    After mixing, make your crab cake patties. This should yield about 4-5 patties. In a hot frying pan, add 2 tsp olive oil and 2 tsp butter. Let this get hot, then add your crab cakes.  Cook on both sides until brown, for approximately 8 minutes each.

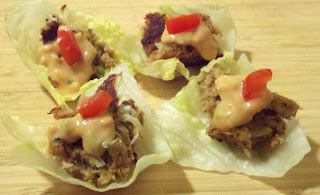
    Once cooked, quarter your crab cakes into bite sized pieces. Select the crunchiest, most sturdy pieces of lettuce that can support the bite size cake and place it in about a 3 inch piece of lettuce. Garnish with a small dollop of remoulade and a tiny sliver of tomato for color and serve.

    Remoulade Dipping Sauce

    This sauce is a perfect pairing for fish dishes. It's great for crab cakes, fish tacos, baked salmon, and any other seafood plate that might need a little perk.


    What you'll need:
    (all veggies are measured as being minced)
    • 3 tsp Light Mayo
    • 1/2 tsp Celery
    • 1/2 Green Pepper
    • 1/8 tsp Worcestershire or Light Soy Sauce (whatever you have)
    • 1 tsp Lemon Juice
    • 1/4 tsp Franks Red Hot
    • 1 tsp Ketchup
    • 1 Clove Garlic
    • 1 teaspoon Spicy Mustard
    • 1/4 tsp Onion


    Mince all vegetable ingredients as finely as possible and add to a mixing bowl with the rest of ingredients. Mix VERY well. Before adjusting the flavors, let this sit mixed and chilled for about 15-20 first and give it a few stirs in between. Then kick up the flavor with extra Red Hot, Garlic, Lemon, or Mustard. Whatever your taste prefers. If you'd like to cool the flavor down, add a little more mayo and Ketchup. (Make this recipe easier by using your food processor to mince!)

    MAN FOOD: Beef Jerky

    For this the inaugural edition of Man Food we're making Beef Jerky!


    Fact: I love meat. Yea I said it.
    Fact: Meat has a slight portability issue.

    Solution: Beef Jerky
    Better Solution: Homemade Beef Jerky.
    The ingredients:
    • Soy Sauce (1/3 cup)
    • Worcestershire sauce (1/2 cup)
    • Liquid Smoke (Just a few drops)
    • Black Pepper (1/2 teaspoon)
    • Onion Powder (1/2 Tbsp)
    • Garlic Powder (1/ Tbsp)
    • Cola (1/4 cup, Optional)
    • MEAT! (1 to 2 lbs.)

    Before you begin, there are a few different ways to dry your Jerky, I used a dehydrator, you can use an oven, or even a box fan and air duct filters. I chose the dehydrator for the simple reason is that we were in the middle of a heat wave and it did not seem like a fun idea to have my oven battle my air conditioning for control over my house.

    This one specifically

    Choosing your steak. Fat does not preserve well choose a steak with light marbling, and when you do come across a bit of fat trim it out. Drying Beef Jerky was originally a way to keep meat from spoiling. Leaving in fat will not add as much flavor as it will just set you up for failure. I don't tolerate failure. At least not when it comes to my Beef Jerky. (If you haven't noticed it yet Beef Jerky will be capitalized in every instance to emphasize its greatness)

    Lets get to the meat. This is a pretty simple technique
    1. Cut your desired steak into thin strips, I go about an inch wide and 1/4 inch thick. Different sizes will dry at different rates, so try to be uniform.
    2. Into a bowl combine all the ingredients and whisk them together. Here's the optional cola part. If your looking for a slightly more mild/sweet flavor. Coke or Pepsi will grant your meaty wish. About 1/4 cup
    3. Marinade in a Ziploc bag for 3-6 hours, unless you used cola then the acidity of the cola will turn you meat into a mushy mush thing.
    4. Dry your meat, use a paper towel to damp dry the excess marinade, the meat itself has absorbed all it will by now and wet meat will only take longer to dry
    5. This is the final stage in which normal everyday meat finishes its beautiful metamorphosis into Beef Jerky (see capitalized)                                                   
    Drying your meat:

    Stove: Put your stove on its lowest setting (probably warm) and hang the steak strips from the rack with tooth picks and tin foil underneath to catch all the drippings. This should take about 10 hours

    Dehydrator: This particular batch took me about 4 hours, check your user manual for more details, different models dry at different speeds

    Fan: As this is Alton Brown's Method we can use his suggestion of 8 to 12 hours

    Pro tip: Your Jerky will continue to dry slightly after its freed from the confines or your drying apparatus. Remove it just before optimal dryness is achieved.

    And there you have it, you just birthed a masculine haunch of Beef Jerky. Look at it, its goddamn glorious.My favorite uses for Jerky are as followed; movie snack, driving snack, zombie Apocalypse survival snack, breakfast, lunch, second dinner, hiking treat, and as an aphrodisiac.

    If you like this article or any other article, or want to suggest a recipe or anything else you can reach us at Itsbestservedhot@gmail.com All feedback is welcome.

    Zuke and Mac

    I have relatives who live in Italy...here is their masterpiece. It's pasta with a zucchini marinara. Thanks Aunt Janie and Uncle Michael!


    What you'll need:

    • 1/4 Large Yellow Onion
    • 4 Zucchini
    • 1 14.5oz can diced tomato
    • 1 8oz can tomato sauce
    • 1/2 Stick Butter
    • 1 Egg
    • Parmesan Cheese (optional)
    • 1 Clove Garlic
    • 1 tsp Oregano
    • 1 tsp Basil
    • Salt
    • Pepper


    Make It:
    Chop and Sautee onion with a dash of salt and pepper in a medium pan with extra virgin olive oil.
    Chop and cube zucchini after deseeding it. I made that mistake once and it sucked. Add de-seeded Zukes to onions.
    Continue to sautee until the zucchini is tender.
    Add the diced tomato to the zucchini and let it cook on low for about 30 minutes. Add seasonings. Add salt and pepper to taste.

    Boil your pasta while your zucchini and onion are finishing up. I like using whole wheat thin spaghetti, but this also works well with farfalle (bow ties), and angel hair.

    While the pasta is cooking...

    In a mixing bowl add that 1/2 stick of butter, cubed. Oh yes, the whole thing. (Where's my healthy agenda you ask? Well, the answer is simple...somtimes a sacrifice needs to be made. This is one of those times. But honestly, you can get away with only using a quarter stick and be okay.) Next, add the raw, beaten egg.

    Before draining the pasta when finished, set aside a cup of the used pasta water.

    In the mixing bowl containing the butter and egg, add the HOT pasta and mix very well. The pasta will cook the egg and melt the butter.

    Then, add the zucchini sauce! If is slightly dry, pour some of that used pasta water in there and mix it up until it reached your desired looseness. If you want to add the cheese, sprinkle it over the top.


    Sweet and Salty Kettle Corn


    Is it raining out?? Are the kids haunting you for snacks and you just don't know what to make them?? Well look no farther! I have a recipe that not only will your kids love, but you will too!
    Don't have kids, No problem!! This is great for a movie, or just lounging around the house type of day!

    Here's what you'll need:
    • Oil (Enough to cover the kernels about halfway)
    • Popcorn Kernels (Remember this stuff expands to about 45 times its un-popped size)
    • Sugar (1 Tablespoon)
    • Salt (To taste)
    • A pot WITH a lid (1)
    That's all it takes for a sweet and savory snack that's big in taste and low in cost!
    Follow these simple steps and you'll be on your way to stuffing your face with this awesome kettle corn. (Don't worry, we don't judge.. Simply because we do it too :-)

    In a large pot pour in some oil just a little bit more than whats needed to coat the bottom. Next dump in the sugar! I use a few tablespoons (at the max!) I find that to generally be sufficient. Now, the amount of pop corn you want to make will vary. For 2 people, I generally find that 1/2 c is PLENTY. Fire up the heat allow the oil to get hot WITH the kernels and COVER! Covering is important, why? Because they fly with molten hot sugar on them. Once they start popping, shake the pot in a circular motion to get all the sugar on each kernel, continue until you don't hear such rapid popping. Pour into a bowl and sprinkle with salt. Allow to cool for a minute and enjoy!


    Lettuce Wraps

    Crunchy and delicious. Super Simple. Fun and healthy.  Trifecta! : )


    What you'll need:

    • 1/2 Head Iceburg Lettuce
    • 1lb 99% Fat Free Ground Turkey
    • 1 Carrot
    • 1/2 Cucumber
    • 1 Handful Dry Roasted Peanuts
    • 1/2 Green, Red, or Yellow Pepper
    • 1 Clove Garlic
    • 1/2 Jalepeno

    Dipping Sauce:

    • 2 tbls Hoisin Sauce
    • 1 1/2 tbls Peanut Butter
    • 1/4 cup Lite Soy Sauce
    • 1/4 tsp Red Pepper Flakes
    • 1 tsp Ginger
    • 1 Clove Garlic
    • Fresh Lemon
    • 1 tbls Rice Wine Vinegar
    Start this off with making the sauce. I like to make the sauce as a a little potent because ground turkey is very bland and flavorless and tends to soak up all the flavor of this sauce when it's cooked in. 

    Very simply mince the 1 garlic clove and ginger as finely as you can. Add all the ingredients of the dipping sauce together in a mixing bowl and whisk until completely mixed or peanut butter blends completely.
    Let this refrigerated while we work on everything else. Taste test...is the sauce a little salty for your taste? Add a little water and a teaspoon of sugar!

    Julienne (cut into thin, long strips) the carrot, cucumber, jalepeno and peppers. In a small bowl add some Rice Wine Vinegar and let them soak. Chop up the jalepeno a little more if you're afraid of the heat.
    Rise your 1/2 Head of Iceburg lettuce well and gently pull off the "cups" and arrange on a plate.

    In a medium dry heated pan, add the ground turkey with the other minced garlic clove. As is begins to cook, start chopping the meat until it starts to look crumbled. Cook thoroughly for approximately 15 minutes.

    Once the turkey is about 80% done, add the sauce and let it cook in. (*If you broke the rules and are using ground beef or chicken or turkey that is not 99% fat free, please drain the fat from your pan before adding the sauce we made.) Have extra sauce? Good! Put it in a small cup on the side for dipping! Continue to cook for another 5 minutes, or until the turkey is done cooking.

    Then, drain the vegetables that were soaking in the Rice Wine Vinegar.

    Arrange the veggie blend on a large serving plate next to a small pile of peanuts with the lettuce cups and a small cup of the dipping sauce in the center.
    In a small bowl, serve the ground turkey on the side or on the plate for individual servings.

    Let the fun begin by building your wraps with all your favorite pieces!


    *Editors note:  I mentioned serving this with peanuts. They are supposed to be on the plate until I realized my lovely boyfriend ate them all. So, you get a dinosaur instead. Don't eat the dinosaur.

    Pasta Dinner in a Dash!

    Don't have much time to cook a meal? In a hurry, on your way out? Or is it just getting too late and want food now?? Well here's a simple recipe that you can make in roughly 20 minutes!


     Here's what you'll need:
    • 1 lb of your favorite pasta. (any type works great!)
    • 1 jar of your favorite sauce (or pre-prepared sauce.. remember, under 20 minutes!)
    • 1 pkg of a ground meat. (I like turkey and chicken because it's healthier.)
    • 1 large pot of water
    • 1/2 Tbls Onion Powder
    • 1/2 Tbls Garlic Powder
    • 1/2 Tbl Basil
    • 1/2 Tbs Oregano
    • Dash of Red Pepper Flakes
    • And a Pinch of Salt and Pepper
    Directions:
    First thing is first, fill the pot with water, and put it on the burner. This WILL take the longest. Now once the pot of water is waiting to boil put a medium sized pan on high heat and let it get hot. Once its relatively hot, chuck in the ground meat, this time I used chicken. I threw onion powder, red pepper flakes, garlic powder, basil, oregano, salt, and pepper on it - feel free to add whatever flavors you like! Once you throw the meat in, get your spatula and start breaking apart the meat while mixing in the spices at the same time. Allow meat to cook fully then throw in the jar of sauce in the same hot pan and allow to simmer until the pasta is completely finished. Once your pasta is finished, throw that into a strainer create a bed of pasta on a plate. Turn off the sauce, and place in the middle of your pasta bed.

    Enjoy!


    The entire meal takes as long as it takes to basically boil water!!
    (P.s. That bread, butter and garlic will return at a later post.. So make sure you check back for something awesome!!)


    Have picky eaters mom? Use fun animal shaped pasta!

    Mango and Avocado Salad

    This isn't really a salad. I came across this recipe when I decided to go on a raw food cleanse. Needless to say, I needed to get super creative. I don't know where I found this idea, but here it is:


    What you'll need:

    • 1 Mango
    • 1 Avocado
    • 1 Tblsp Extra Virgin Olive Oil
    • Salt
    • Lime

    Make It:

    Cut up your ripe mango and avocado into cubes. How do you cut a mango you ask? Find out HERE. Use the same technique for the avocado.

    Put your finished cubes of fruit into a bowl and add the Extra Virgin Olive Oil, dash in some salt, and squeeze half of the lime on top. Mix all ingredients gently and let chill.

    Serve happily!

    Nearly Guiltless Nachos

    I can't be perfect all the time. As much as I hate to admit it, I could eat nachos as a meal three times a day, everyday. They are perfect for me and I love them.


    What you'll need:

    • Whole grain tortilla chips
    • Fat free cheddar cheese
    • Fat free pepper jack cheese
    • 5 Grape tomatoes
    • Romaine lettuce
    • 1/2 Fresh jalepeno
    • Fat free sour cream
    • Salsa


    Make it:
    It's amazing how something sooo simple can be soooo amazing.

    Start by placing your cheeses in a microwave safe bowl, add a dollop of some of the sour cream and stir it all in. Microwave until the cheese melts for about 1 1/2 minutea and stir after every 30 seconds. If your cheese isn't melting in the microwave correctly, bake the chips with the cheese until it's all melted and then follow the steps below.

    Chop up your veggies into bite size pieces that will sit comfortably on a chip!

    Lay out your chips on a large plate and then pour the cheese over the tortilla chips. Top with the jalepeno slices, chopped tomato, and shredded romaine lettuce.

    Either on the side, or plopped in the center, add your salsa and sour cream.

    Optional: You can always add guacamole, black olives, avocado, grilled chicken or ground turkey

    PS. Corn tortilla chips are in the photo above, because they were on sale and whole grain wasn't. waaa

    California Chicken Salad

    Can I just say that I LOVE this chicken salad, and so does everyone who puts it in their mouths. I was in San Diego and ordered it as a side dish...for breakfast...don't judge me...and tried to replicate it as soon as I got home. I turned mine into a SAMMICH!


    My preferred way to enjoy is by making it on a whole wheat bun with sliced tomato and fresh romaine lettuce.

    What you'll need:

    • Chicken tenderloins
    • 1/2 cup Light Sour Cream
    • 1 tblsp Light Mayo
    • Celery
    • Cucumber
    • Dried Dill
    • Salt 
    • Pepper
    • 2 Garlic cloves
    Make it:

    Boil a medium size pot of water. Add salt, pepper, and the two sliced cloves of garlic. Bring it to a boil and add the chicken. Let this cook until done, approximately 10-15 minutes. Boiling the chicken will keep it juicy and the salt, pepper, and garlic will inject flavor.

    In the mixing bowl:
    We will use 1/2 of the cucumber. Peel it and then de-seed it. To de-seed: cut it long ways and then take a spoon to scoop out the seeds. Dice up the peeled and de-seeded cucumber into tiny cubes. 
    Chop up 1 stalk of celery into fine cubes as well
    Add 1/2 cup of light sour cream along with the light mayo
    Add a large pinch of dried dill seasoning. I tried this recipe with fresh dill and actually liked it less than I did when using dried dill seasoning. 
    Add salt and pepper to taste.
    Mix this all up and let it chill in the refrigerator while we work on cutting up all this chicken.

    Once the chicken is cooked, drain it and chop it up into small cubes, or shred it. However you prefer. Let it cool slightly before adding to the mixing bowl. 

    Mix everything together and taste test until the salt/pepper/dill ratio is right and then its ready to be chilled. 

    Served chilled and enjoy :)

    Other options: Add craisins! Also, I learned through forum content by some gracious users that greek yogurt could replace the mayo.  SUCH a great idea! I'll update when I find out for myself!


    Fantastic Southern Style Sweet Tea!!

    Say it with me now: "Sweet Tea"
    Again, with a Southern accent now!

    Gooooood (I think...)

    For roughly under a dollar, you can sip on 8 cups of a delicious beverage that you would normally spend several dollars a cup on. 'Impossible' you say?? I think not!

    So here's what you'll:


    (Yeah, That's it..)
    • 1 C. Sugar
    • 6 C. of Cold water (Doesn't need to be ice cold...)
    • 2 C. of boiling water.
    • 3 Tea Bags
    • Water holding device...
    Now, I've seen, read, heard, and what have you about adding a dash of baking soda to the sweet tea. I've done it both ways and taste no difference so just save your baking soda for another time.

    Now- In a small pot bring 2 cups of water to a boil along with 1 cup of sugar. Once the sugar is completely dissolved, add the tea bags until they start brewing. Allow to cool to room temperature (as to not break whatever your pouring into.) Then pour sugar water, and tea bags into the cold water.... Allow to sit for several hours to so the flavors can get to know each other, and get nice and ice cold. Then Enjoy!

     That simple!!


    Extra goodies:
    Want to impress a few friends? Garnish an ice cold glass with a lemon and enjoy.

    LinkWithin

    Related Posts Plugin for WordPress, Blogger...